EXERCISE GLOSSARY
Welcome to the PHBP exercise glossary. Here you will find information on how to perform each of the exercises and stretches within the PHBP programs. Please ensure you have correct posture throughout all exercises, our blog HERE will be able to help you with this, and for abdominal exercises please refer to our post on Diastasis Recti HERE.

LEG STEP UP
Standing with correct postural alignment and eyes forward
Step up with the right foot
With the left foot bring it up, touch the bench, then step the left foot down
The right foot will always stay in contact with the bench
Change legs
LEG side STEP UP
- Standing with correct postural alignment and eyes forward and a chair or step to the side of you
- Step up with the foot closest to the box
- With the other foot bring it up, touch the bench, then step this foot down
- The other foot will always stay in contact with the bench
- Be sure to never lock the knee
This exercise is used to target the glutes, to target the legs more bring both legs off the bench and back up.
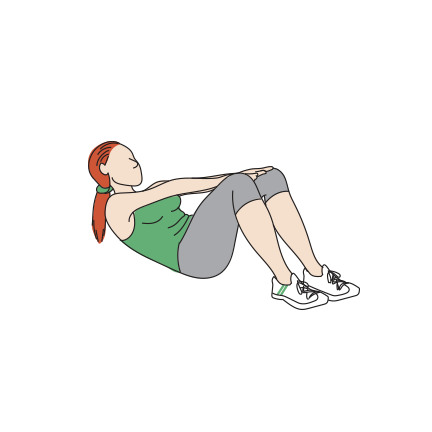
ABDOMINAL CURL UP
Lying on your back with correct postural alignment and looking forward
- Knees bent to 90 degrees
- Hands palm down at the top of the thigh
- While performing abdominal hollowing slowly slide your hands up your thigh gently bringing your upper back off the floor using your abdominals
- Slowly return back to the floor while performing abdominal hollowing still

OBLIQUE CURL UP
- Lying on your back with correct postural alignment and looking forward
- Knees bent to 90 degrees
- Hands palm down, one on top of the other on one leg
- While performing abdominal hollowing slowly slide your hands up your thigh but past the outside of your knee gently bringing your upper back off the floor to the side using your obliques.
- Slowly return back to the floor while performing abdominal hollowing still

ARNOLD PRESS
- Standing with correct postural alignment and eyes forward
- Hold the weights parallel at chest height with your palms facing the body
- Slowly push the weight up above the head turn, your hands out as you push up so your palms face away from your body at the top of the movement
- Reverse as you come back down so your palms are again facing the body
- Be sure never to lock the elbows

AROUND THE WORLDS
- Standing with correct postural alignment and eyes forward
- Hold the weights palms facing forward away from the body
- Carefully with unlocked elbows bring the weights just about together above the head in a controlled manned, reverse it so your hands are back by your sides

BENT OVER ROW
- Pick up the weights carefully
- Standing with correct postural alignment, knees off lock and eyes forward flex forward at the hips to about 40 degrees
- Start with the weight tucked in your sides at about nipple height
- Your elbows should be higher than your back.
- Slowly Lower the weights down keeping elbows off lock so the weight is directly below the chest
- Bring the weights back up to chest height, elbows higher than the body and repeat

BRIDGE
- Lying on your back with correct postural alignment and looking forward
- Knees bent to 90 degrees
- Hands palm down on the floor by your side
- While performing abdominal hollowing push through the heels and raise your glutes so your hips are inline with your knees
- Squeeze at the top then slowly lower back down, still holding abdominal hollowing
One Leg bridge
As above
While performing abdominal hollowing raise one leg straight so your knees are in line
Squeeze at the top then Slowly lower back down, still holding abdominal hollowing
BURPEE
- Start in a standing position with correct postural alignment
- Lower to the floor, put your hands out in front of you and jump the legs out behind you, you should end up in a plank position
- Jump back in and then jump up back to starting position
This is a difficult move and you should always start with a slower version, simply walking feet in and out, particulary if you have abdominal seperation


Chest Fly
- With weights carefully Lie on your back with correct postural alignment and looking forward
- Knees bent to 90 degrees
- Start with your arms out to the side of you and your palms facing up.
- From this position with your elbows off lock and arms straight bring the weights together just above your chest.
- Take the weights back down

chest press
- Lying on your back/ on a bench with correct postural alignment and looking forward
- Knees bent to 90 degrees or if on a bench legs down by the side.
- Position the dumbbells at the shoulders with upper arms at about 45 degrees to the body with elbows forward of the shoulder line to avoid stress on the shoulder joint. The palms should face forward.
- Slowly and controlled push the weight upwards making sure you don't lock the elbows
- Lower the weight back to the starting position

PLANK level 1
- Lay straight on the floor with your elbows shoulder width apart and directly below the shoulders, and feet inline with your hips
- Whilst performing abdominal hollowing come up onto your elbows and knees.
- Hold this position for the set time
Plank Level 2
- Level 2 is coming off your knees, ensuring abdominal hollowing and that you can hold correct posture in this position.
This is a progression and should not be done in women where diastasis recti is present.

COMmANDO CRAWL
In plank level 1
- Lay flat on the floor with your elbows shoulder width apart and directly below the shoulder. and feet inline with your hips
- Whilst performing abdominal hollowing come up onto your elbows and knees
- With correct form and abdominal hollowing go from elbow to hand on the left hand then on the right hand.
In plank level 2
- Level 2 is coming off your knees, ensuring abdominal hollowing and that you can hold correct posture in this position
- With correct form and abdominal hollowing go from elbow to hand on the left hand then on the right hand

curtsy lunge
- Standing With correct postural alignment and eyes forward
- Take one leg back and slightly to the side into a curtsy, your hips and feet should be facing forward as much as possible
- Bring the leg back to the centre and back again
Speed Skaters
- This is a cardio move using a curtsy lunge
- Go from a curtsy lunge in one leg then smoothly and quickly go straight into a curtsy lunge in the other leg
DEADLIFT

- Standing with correct postural alignment and your legs shoulder width apart and eyes forward
- Squat down to take an overhand grip of each dumbell, the dumbells should be just in front of your feet
- Push through the heels to come back to a standing position
- Do not lock your knees, your bum goes down not out
- With your back straight, lower your bum down, as if you are about to sit on a chair until the weights touch the floor ensuring your heels don't raise off the floor
- If you are unable to get that far down only go as low as you can with good form
- Your toes, hips and shoulders should be facing forward

DIP
- With correct postural alignment and eyes forward
- Using a chair or a bench place your hands on the edge of the bench with legs bent at about 90 degrees
- Your back should be straight, bum in line with your head
- Using your arms, bend at the elbow to lower the body, not using your legs
- To progress this exercise you can put your feet further out
- Ensure not to lock the elbows
FRONT RAISE
- Standing with correct postural alignment and eyes forward
- Hold the weights just in front of your quads palms facing your legs
- With your elbow slightly off lock raise the weights in front of the body to shoulder height, so your hands and elbows are inline with the shoulder
- Slowly lower back down and repeat for desired reps

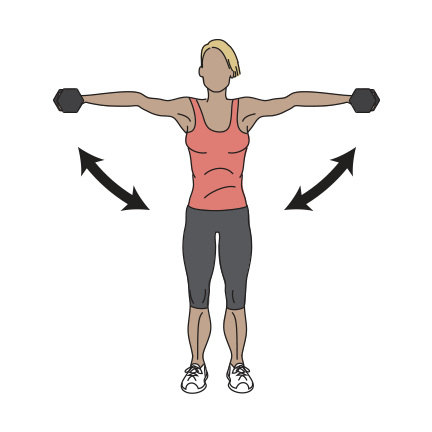
Lateral Raise
- Standing With correct postural alignment and eyes forward
- Hold the weights to the side of your body palms facing towards the side of your legs
- With your elbow slightly off lock raise the weights away from the body to shoulder height, so your hands and elbows are inline with the shoulder
- Slowly lower back down and repeat for desired reps
LUNGEs and Split squat

- Standing with correct postural alignment and eyes forward
- Take one leg back/forward depending on what is stated, the foot should land with the knee bent to a 90 degree angle with your hip, knee and foot
- Your hips and feet and shoulder should be facing forward
- Bring the leg back to the centre and repeat for desired reps then swap legs
- A split squat is just squatting in a forward lunge position.
SIDE LUNGE
- Standing with Correct postural alignment and eyes forward
- Take one leg out to the side the foot
- As your foot lands the knee should be bent and the bum goes down
- Your knee and foot your hips and feet and shoulder should be facing forward
- Bring the leg back to the centre and repeat for desired reps then swap legs
Swing lunge
- Is a back lunge and straight into a front lunge, you swing into it, you can hold onto a wall for this and its normally unweighted as it is challenging enough

Mountain Climbers
- In a plank position, on your hands bring one knee to your chest then the other knee
- This is a cardio move so should be smooth and fast with good form
RENEGADE ROW
- In a plank position with a dumbell in each hand
- Then follow actions of completing a bent over row
WALK OUT
- From standing position walk the hands from the feet all the way into a plank, not going onto your elbows
- Then walk the hands back again
ONE ARM ROW
- Using a chair or bench, rest one knee and the same side hand on a bench so you have a good posture, table top back
- With the other hand pick up the weight and start with the weight up in your sides at about nipple height
- Your elbows should be higher than your back
- Slowly Lower the weights down keeping elbows off lock so the weight is directly below the shoulder
- Bring the weights back up to chest height, elbows higher than the body and repeat for desired reps then swap sides

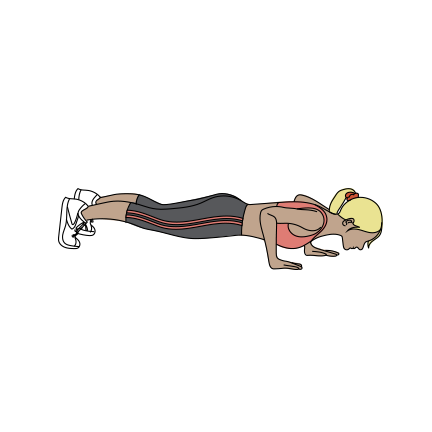
PRESS up
- Begin In the level 1 plank position
- Take your hands to a natural pushing position for you, ensuring your hands are below your chest, your elbows might sit closer to your body, for more of a tricep press up or wider which will engage the back more
- With the plank perfect form lower your chest by bending the elbows, get as low as you can the push back up
- Your back should not dip at all, if it does bring your knees in more
- To progress you could try a full press up but this must not be attempted if disatisis recti is present and/ you are 6 months or less postpartum
PRONE/ BENT OVER RAISE/ FLY

- Standing with correct postural alignment and looking forward slightly lean forward, back straight to about 40 degrees, knees off lock
- Start with the arms straight directly below the chest palms and weights facing each other
- From this position with your elbows off lock and arms straight back to feel the back of your shoulder working your shoulder, elbow and hand should be inline
- Take the weights back down and repeat
Y/ I/T RAISE
- Standing with correct postural alignment and looking forward slightly lean forward, back straight to about 40 degrees, knees off lock
- Start with the arms straight directly below the chest palms and weights facing each other
- From this position with your elbows off lock and arms straight back to feel the back of your shoulder working your shoulder, elbow and hand should be in line,This is a T raise
- For an I raise from the starting position take the weights directly up towards the face
- For a Y raise take the arms up towards the face but in to a y, so slightly out either side of the face

ROMANIAN DEADLIFT
- Standing with correct postural alignment hold the weights in front of your body, palms facing the body
- Slowly and carefully flex forward at the hips, keeping the weights close to the body as they lower
- Feel the stretch on the hamstring and glutes, going as low as you can without your back rounding and come back to the standing in position
- Your feet and hips should be facing forward

SHOULDER PRESS
- Standing with correct postural alignment and eyes forward
- Hold the weights parallel at chest height with your palms facing away from the body
- Slowly push the weight up above the head, then bring them slowly back down to just above chest height.
- Be sure never to lock the elbows
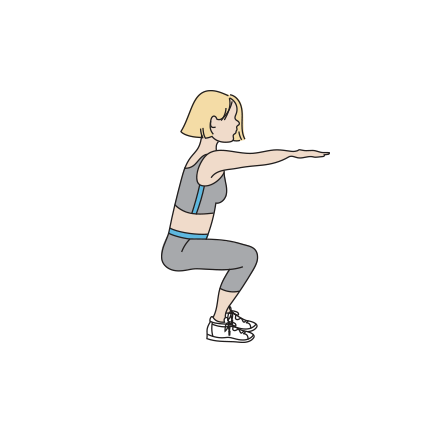
SQUAT
Standing With correct postural alignment and your legs shoulder width apart and eyes forward
- With your back straight lower your bum down, as if you are about to sit on a chair to 90 degrees
- Your toes, hips and shoulders should be facing forward
- Push through the heels to come back to a standing position.
- Do not lock your knees, your bum goes down not out
WIDE LEG SQUAT/ Plie squat
- Standing With correct postural alignment and eyes forward with your back straight take your legs as wide as they can to the side
- Point your toes out lower your bum down, as if you are about to sit on a chair to 90 degrees
- Hips and shoulders should be facing forward
- Push through the heels to come back to a standing position
- Do not lock your knees, your bum goes down not out

STRAIGHT ARM PULLOVER
- Laying on a bench or the floor with correct postural alignment start with one weight in both hands
- Your hands, arms straight and directly above the chest, the elbows should be off lock
- Slowly and carefully lower the weight behind your head. Your back should be flat and not come up off the bench
- Once you have taken it as far as you can carefully bring it back over to the starting position

UP ROW
- Standing with correct postural alignment and eyes forward
- Hold the weights just in front of your quads palms facing your legs
- Bend your elbows and bring the weight up to chest height, the elbows should be higher than the hands and the weights just about touching as you bring these up
- Slowly lower back down and repeat for desired reps
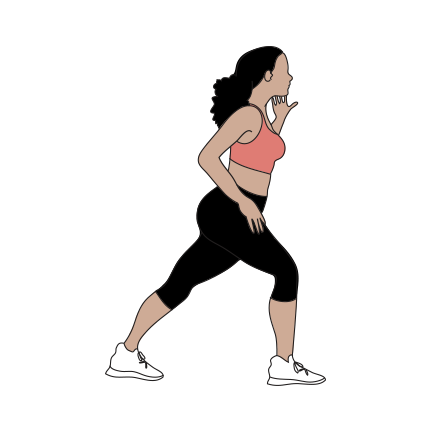
STRETCHING

HAMSTRING STRETCH
- Standing with correct postural alignment and eyes forward, holding on to a wall if you need to
- Take one leg forward, slightly bend the back leg and lean into the front leg to feel the stretch in the back of your uper leg
- Hold for 8-10 seconds and swap legs
calf stretch
- Standing With correct postural alignment and eyes forward
- Holding on to a wall if you need to
- Take one leg back and slightly lean forward to feel the stretch in your lower leg
Hold for 8-10 seconds and swap legs
Hip flexor stretch
- Standing with correct postural alignment and eyes forward, holding on to a wall if you need to
- Take one leg back and slightly lean forward to feel the stretch in your lower leg, from this tilt the pelvis forward and slightly up to feel it in the hip flexor
- Hold for 8-10 seconds and swap legs

LYING GLUTE STRETCH
- Laying with correct postural aligment and eyes forward
- With one leg straight bring the other knee towards your chest
- Hold for 8-10 seconds and swap legs

Lower Back Stretch
- Laying with correct postural alignment and eyes forward
- Bring both legs towards the chest by placing your hands just behind your knees
- Let your lower back come off the floor
- Hold for 8-10 seconds

QUAD STRETCH
- Standing with correct postural alignment, eyes forward and holding on to a wall if you need to
- Take one foot towards the buttocks and hold the stretch
- Your knees should be forward and together
- Hold for 8-10 seconds and swap legs
TRICEP STRETCh
- Standing With correct postural alignment and eyes forward
- Bend your elbow and take your hand over your head. Your palm should now be facing the middle of your upper back
- With the other hand lightly press the elbow back to feel the stretch in your tricep
- Hold for 8-10seconds then swap arms
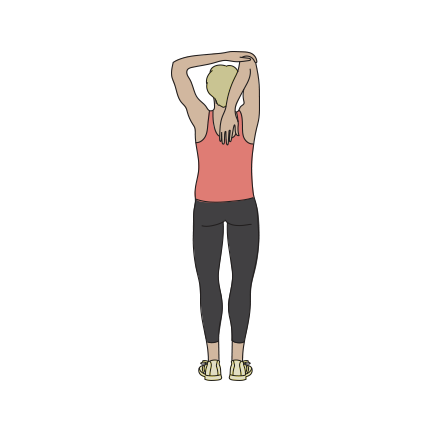
UPPER BACK AND MID BACK STRETCH

- Standing or seated with correct postural alignment and eyes forward
- Take you hands above your head
- With your hands together push up
- Hold for 8-10 seconds
- Then take your hands in front of your chest to feel this in the middle of your back
- Hold for 8-10 seconds
CHEST STRETCH
- From the upper back stretch position as shown take your hands behind your chest and push your chest out
- You could also bend your elbows slightly and push you hands into your lower back
- Hold for 8-10 seconds